There are a few reasons a MacBook Pro won’t turn on. It could be a hardware issue, like a problem with the battery that's preventing it from charging, or it could be software related.
While it’s scary to deal with a blank or black screen, you can follow these troubleshooting methods for both Apple silicon MacBooks and older Intel-based models to try and get your computer working again.
It's also worth checking your warranty coverage: Apple offers a one-year limited warranty, but keep in mind that there might be service fees or deductibles, and accidental damage isn't always included. Contact Apple support or go to an Apple store if you need help understanding your warranty and terms.
If you try all these things and your MacBook Pro still won’t turn on, we can help with Mac data recovery services. We have a 96% success rate and won’t charge you if we can’t recover your data.
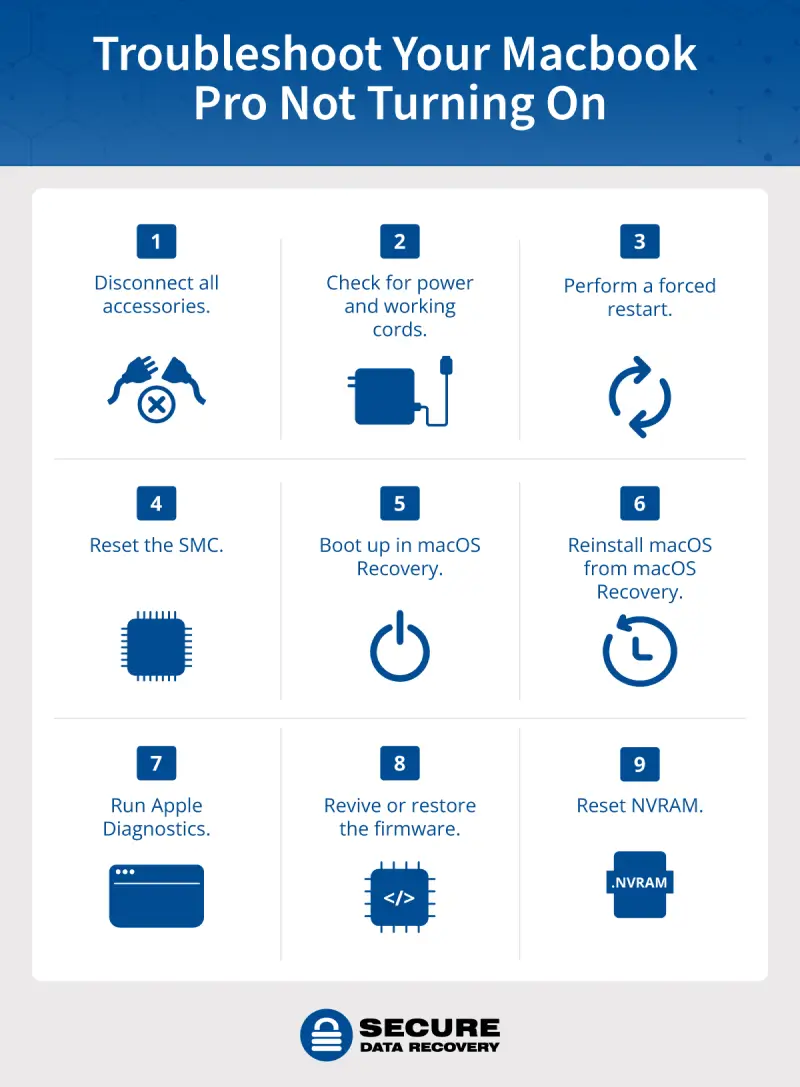
1. Disconnect All Accessories
The problem with your Mac might not be the Mac itself. Try disconnecting all accessories and USB hubs from your Mac. You’ll also want to uninstall any peripherals, external displays, and third-party devices connected to your computer in case one of them is causing the issue.
After you’ve disconnected all of them, try restarting your MacBook to see if it will turn on. If it works, reconnect and reinstall each device one by one, restarting your Mac after each installation, to identify if any of your accessories are the problem.
2. Check for Power and Working Cords
It’s possible that your computer’s power is drained and your Mac needs to be charged. Plugging the charger into the power adapter and a working outlet could show you if your battery is dead and just needs to recharge. Because batteries have a finite number of charge cycles (also referred to as power cycles), you may need a new battery if yours isn’t holding charge.
Also, make sure you’re using a compatible power cord. Otherwise the power connection might not work to turn your computer on. Check that the power cable is the right one for your device, i.e., USB-C, and make sure it’s in a working outlet at the right wattage. If you have the right type of cable, swapping your current one out for a different but compatible cord can show you if your usual cable isn’t working.
Here are the steps to try this troubleshooting method:
- Plug your power adapter into your Mac and into a power outlet.
- Unplug any devices currently connected to your computer, except the adapter.
- Hold down the Command and Control keys while pressing the power button to restart your Mac.
- Allow your battery to reach at least a 10% charge before reconnecting any external devices or resuming work on your Mac.
3. Perform a Forced Restart
A forced restart or a hard reset forces the system to shut down. You can do this by pressing and holding the power button for about 10 seconds. Once the computer has shut off, press the power button again to turn it on.
You may need to try this if the computer sounds like it’s on, but the screen is blank or black.
Restarting your computer is a good fix to try because it can clear your computer’s memory. Overloaded memory may cause issues like system crashes and unresponsiveness, so resolving this can help your computer boot properly.
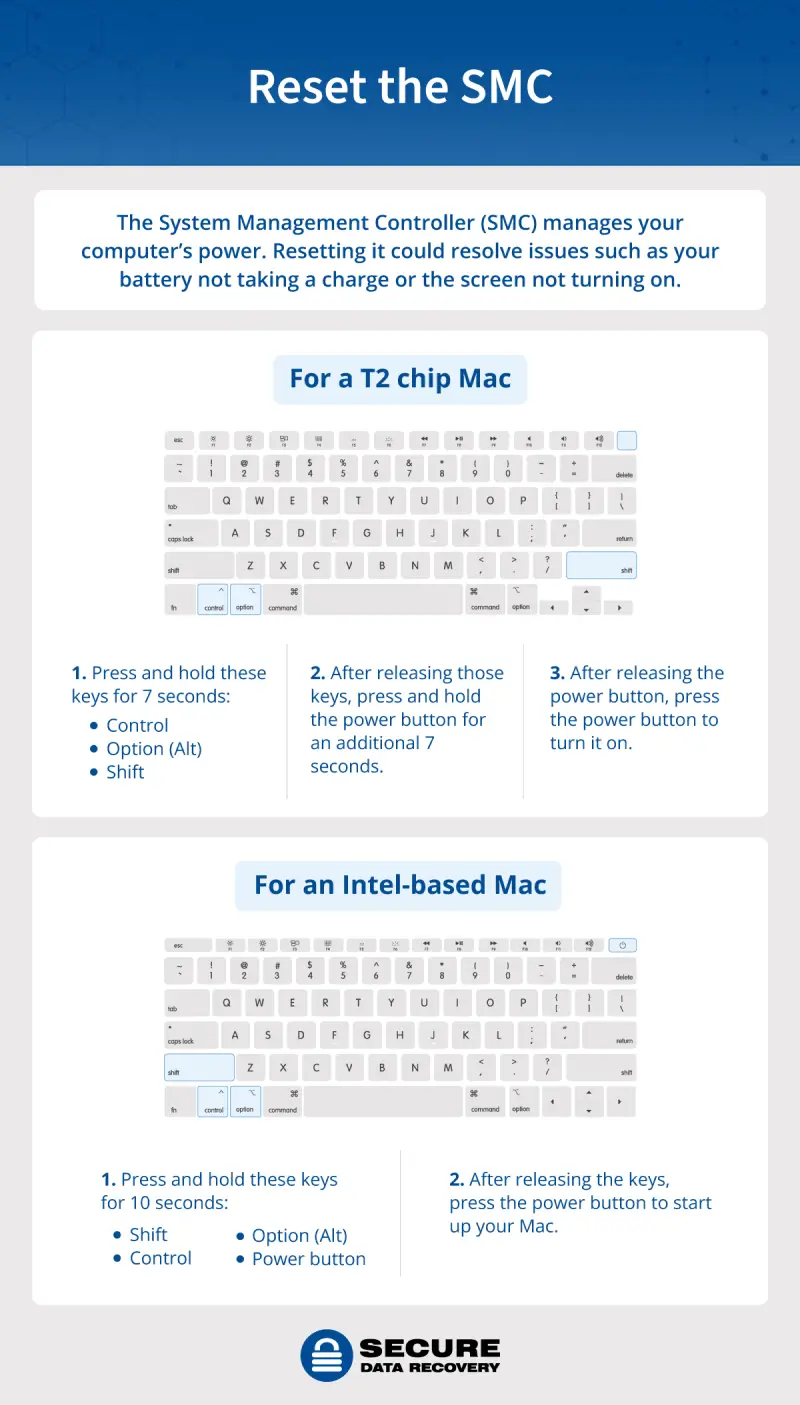
4. Reset the SMC
If a forced restart doesn’t work, you may need to power on your Mac while holding certain keys, resetting the System Management Controller (SMC).
The SMC manages power to your Mac, so resetting it could resolve issues impacting the screen, such as the battery not taking a charge or the screen not turning on. If your Mac won’t hold a charge or the screen is blank, reset the SMC.
You may see a light indicator (green or amber) letting you know if it’s charging or not or holding a charge. If the amber light is blinking, seek help from Apple.
For an Apple silicon Mac
- Plug your Mac into a power source.
- Restart by either choosing the Restart option on the Apple menu, or the Shut Down option on the Apple menu and manually restart by pressing the power button.
For a T2 chip Mac
Before you reset the SMC, follow these steps:
- Shut down your MacBook.
- Hold down your Mac’s power button for 10 seconds, then release it.
- Wait a few seconds. Then, press the power button again to turn on your Mac.
This might be enough to resolve your issue, but, if it isn’t, here’s how to reset the SMC:
- Shut down your Mac.
- On your keyboard, press and hold the Control and Option (Alt) keys on the left side and the Shift key on the right side for seven seconds.
- While holding these keys, press and hold the power button, too.
- Keep holding the keys for another seven seconds, then release them.
- After a few more seconds, press the power button to turn on your Mac.
For an Intel-based Mac
- Shut down your Mac.
- Press and hold Shift, Control, and Option (Alt) keys on the left side of the keyboard.
- Press and hold the power button at the same time.
- Hold all four for 10 seconds.
- Release the keys and then turn on your Mac.
5. Boot up in macOS Recovery
If your Mac isn’t working due to startup disk issues, using recovery mode may resolve your problem. Recovery mode, which is different from safe mode, is a built-in recovery system that works to repair internal storage, restore files, or reinstall macOS.
For an Apple silicon Mac
- Press and hold the power button for 10 seconds, ensuring that your Mac is turned off.
- Press and hold the power button again. As you hold the power button, your Mac should turn on and load startup options. When you see the options, release the power button.
- Click Options, and then click the Continue button that appears beneath it.
- The Utilities window should pop up. From there, use Disk Utility to repair your startup disk, and then restart your Mac.
- If your Mac restarts to a blank screen again, reinstall macOS.
For an Intel-based Mac
- Restart your Mac.
- As soon as it begins to restart, hold down any of the key combinations that follow and continue holding until the startup screen appears:
- Command-R: This combo will open the macOS Recovery System built into the hard drive. From here you can reinstall the most updated version of macOS or utilise other apps and tools in macOS Recovery.
- Option-Command-R: If you use this combination, you can start your macOS Recovery through the internet. From here you can ensure you have the most updated and compatible version of macOS reinstalled.
- Option-Shift-Command-R: Start up from macOS Recovery over the internet. Use this key combination to reinstall the version of macOS that came with your Mac or the closest version that’s still available.
- If you notice the lock symbol, just type in your Mac’s password.
- Choose the correct volume that needs to be recovered if you have more than one volume, and then click Next.
- You may be asked to select an administrator account. After you choose one, click Next, type in your administrator account’s password, and then click Continue.
If Disk Utility finds errors that can’t be repaired, it’ll ask you to erase or reformat your disk. However, doing this will result in irreversible data loss.
If you reach this point, it’s best to seek help from the professionals at Secure Data Recovery. We have Apple-certified technicians who can work to recover lost macOS files and other compromised data.
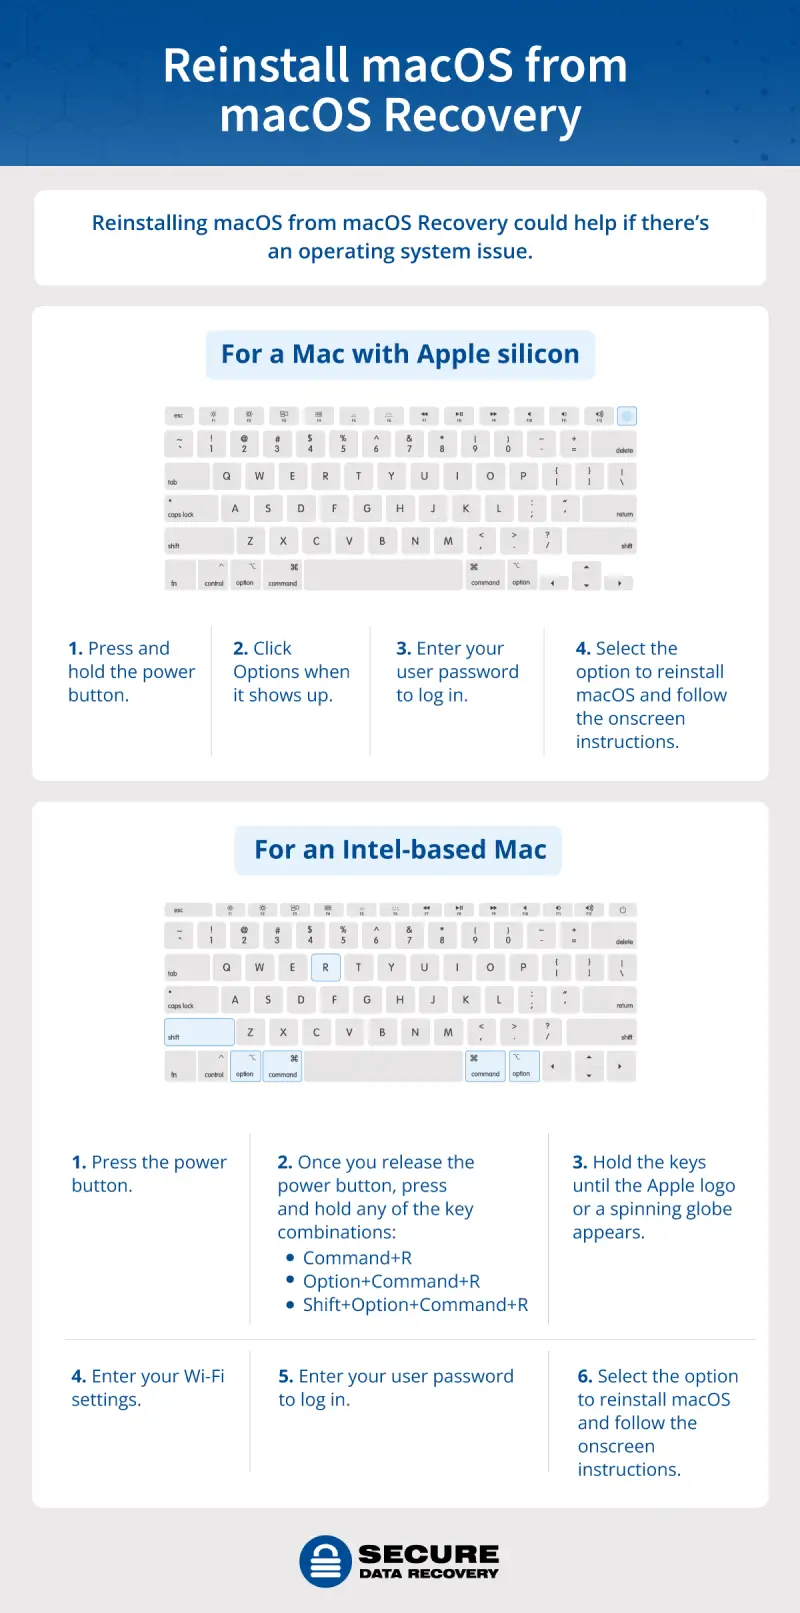
6. Reinstall macOS from macOS Recovery
If your Mac screen doesn’t turn on because of an operating system issue—for example, frequent crashes or freezes, or another hardware issue that you might have already been dealing with—then reinstalling the operating system from macOS Recovery could help.
Reinstalling macOS won’t remove your apps or personal information. Here’s how to do it on Apple silicon and Intel-based Macs.
For an Apple silicon or Intel-based Mac
- Once your Mac has booted up in Recovery, select the option to reinstall macOS.
- Click Continue, then follow the instructions on your screen.
- If you’re asked during installation to unlock your disk, type in your Mac’s log-in password.
- If given a choice between "Macintosh HD" or "Macintosh HD - Data," choose to install on “Macintosh HD.”
- If the installer doesn't see your disk, it might prompt you to erase your disk. But keep in mind that erasing your disk will very likely lead to data loss — so it’s best to stop here and take your MacBook to the professionals.
- Don’t let your Mac go to sleep and don’t close its lid before installation has completed. Otherwise, you risk restarting your Mac and having an empty screen for minutes.
- After the installation has finished, you have a Mac setup assistant begin. If so, just follow along with the steps.
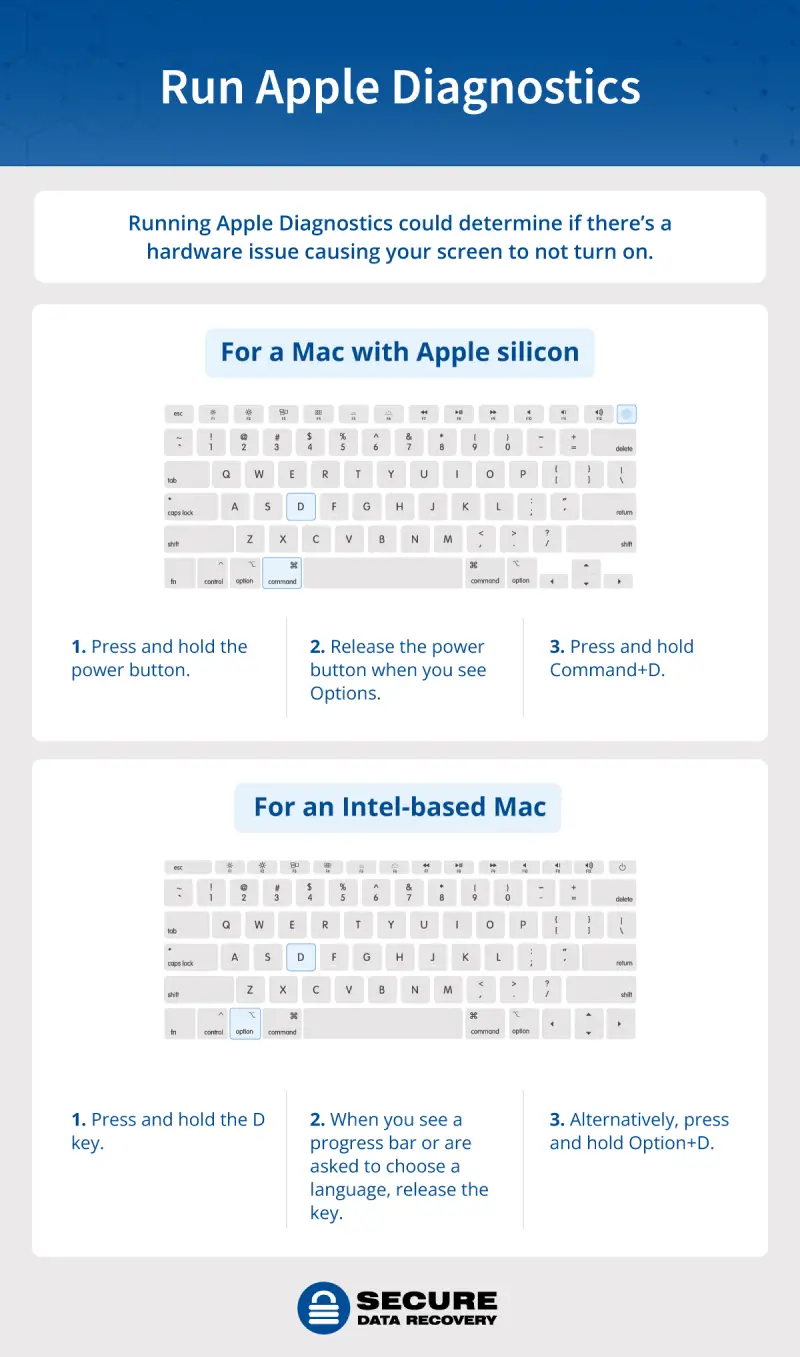
7. Run Apple Diagnostics
Running Apple Diagnostics allows you to check for hardware issues and determine what the root of the problem is.
If no issues are found, then you’ll see this code: ADP000. If you see any other code, then you’ll likely need to send your Mac to an Authorised Service Provider, like Secure Data Recovery, to evaluate the issue and recover your data.
For an Apple silicon Mac
- Press and hold the power button on your Mac.
- Your Mac should turn on while you’re holding the power button, and you should see startup options load. When Options appear, release the power button.
- Press and hold Command-D on your keyboard to start Apple Diagnostics.
For an Intel-based Mac
- Try to turn on your Mac, and then immediately press and hold the D key on your keyboard as it starts up.
- Release the key when you see a progress bar or you're asked to choose a language. If using the D key doesn't work, try pressing and holding Option-D at startup instead.
8. Revive the Firmware
If your Mac isn’t turning on because of a power failure that interrupted a macOS installation, reviving the firmware might help resolve the issue.
Note that restoring the firmware can erase any of your files, so try to revive first and then seek professional help from data recovery specialists if that doesn’t work.
For an Apple silicon Mac
- If using the Finder (requires macOS Sonoma or later):
- In the sidebar of a Finder window, select “Mac,” as pictured above.
- Click Revive Mac on the right, then click Continue to confirm. A progress bar in this window shows that the revive is underway.
- If using Apple Configurator (requires macOS Monterey 12.4 or later):
- Open Apple Configurator, which you can download from the App Store.
- In the Apple Configurator window, select "DFU" for your Mac.
- From the menu bar, choose Actions > Advanced > Revive Device. A progress bar in this window shows that the revive is underway.
- When the revive is complete, your Mac will restart automatically. If it shuts down instead, press the power button to turn it on.
- If prompted, select a volume to recover (such as Macintosh HD), then click Next.
- If prompted, select a user you know the password for, and enter that user's login password. Click Next, then click Restart.
- The revived Mac loads startup options, which includes Options with a gear icon. Select your startup disk (such as Macintosh HD), then click the Continue button that appears below it.
- The revived Mac finishes starting up and the process is complete.
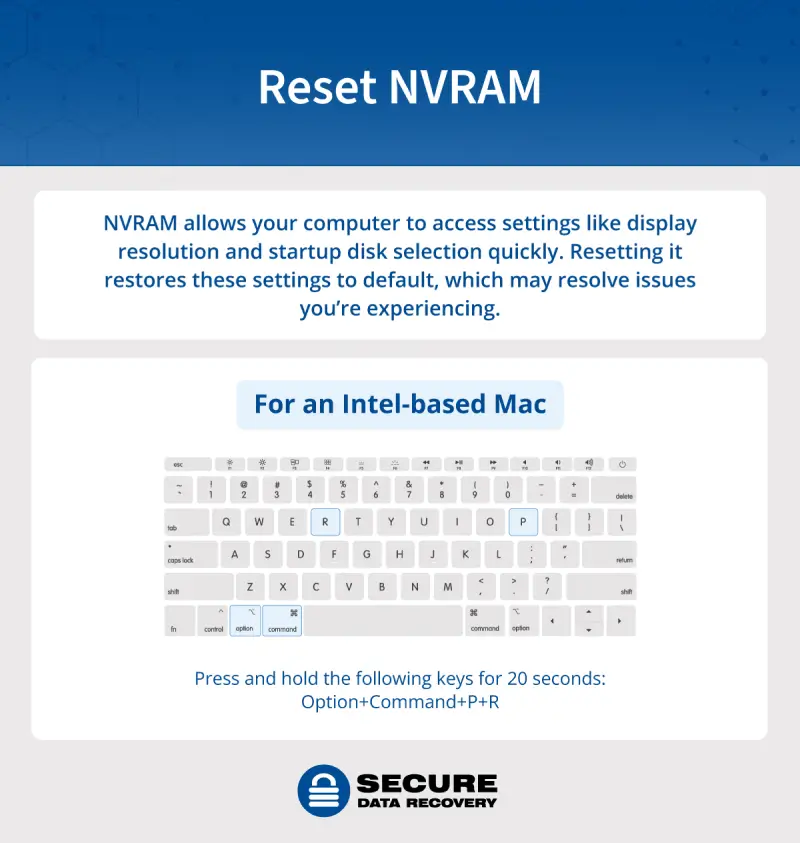
9. Reset NVRAM
Resetting NVRAM is a good last-resort troubleshooting step if some of your settings aren’t working properly, such as your screen not turning on.
Because this is recommended as the last step before you sell your computer, it could result in data loss — you’re essentially clearing your memory and security settings.
Ideally, you should only use this option if you know you have a backup of your data on your computer. Otherwise, seek professional help. Also, only Intel-based Macs have the option to reset NVRAM.
For an Intel-based Mac
- Shut down your Mac.
- Turn on your Mac and immediately press and hold these four keys together: Option (Alt), Command, P, and R.
- Release the keys after about 20 seconds. Your Mac might appear to restart during this time. For example, you might hear a startup sound more than once, or see the Apple logo more than once.
- When your Mac is done starting up, you might need to adjust system settings that were reset.
Troubleshooting to Avoid
If you look for troubleshooting options online, you might find user-based forums where people recommend different methods than the ones we’ve described here. But be very careful — some of these methods can be dangerous to your Mac. Here are a couple of common examples.
- Removing the battery. Reddit users recommend this method, but don’t try it — you could destroy your Mac or lose your data permanently. It’s a much better idea to trust your Mac to a professional, which will more than likely save your device and your data in the process.
- Erasing your disk during macOS Recovery. Though you might see this option come up, it’s a bad idea from a data recovery perspective because it can result in lost files.
MacBook Pro Failure Prevention Tips
Though you can’t always guard yourself against hardware or software failure, maintaining your Mac is key to helping it function properly. Here are some tips to keep your Mac running smoothly.
- Back up your Mac regularly. Data backups can help you prevent losing data if your Mac ever fails again. You can easily back up your Mac using Time Machine by connecting an external storage device and setting it as your backup. Once you have your data backed up, you can restore a computer from a backup in the future. You can also set the frequency for automatic backups.
- Keep MacBook Pro up to date. Checking for updates and updating your OS regularly ensures you have the most current and best-functioning system. Before you update your software, make sure you’ve backed up your data and that your Mac is connected to the internet. Once you’re ready, go to Software Update from the Apple menu and run it to search for and automatically install new updates.
- Avoid overheating. Excessive heat can damage your device. Use your MacBook in areas that allow for good ventilation to prevent overheating.
- Handle with care. Dropping your MacBook or spilling liquids on it can damage it, sometimes beyond repair.
- Manage your storage. Properly managing your storage by keeping it at optimal levels, and not letting it reach full capacity, can improve the longevity and performance of your Mac.
We Can Help Recover Your MacBook Data
Don’t panic if your MacBook won’t turn on. Secure Data Recovery is an authorised Apple service provider that can recover Mac data that may have been lost. When you bring your Mac to us, you can rest assured knowing it’s in expert hands. Plus, with our "No data, no recovery fee" guarantee, you only pay if we successfully recover your precious files. Contact us to get started today.