It’s frustrating when you’re trying to access an external hard drive for storage, gaming, sharing data, or digital editing, but it isn’t showing up as it should.
Not being able to locate your external hard drive doesn’t necessarily mean it’s corrupted or that you’ve lost your data, but it could mean something’s awry.
In this article, we provide troubleshooting steps if your external hard drive isn’t showing up. If you try them and you’re still worried about losing your data, stop where you’re at and contact us for hard drive data recovery services.
Reasons an External Hard Drive Might Not Show Up
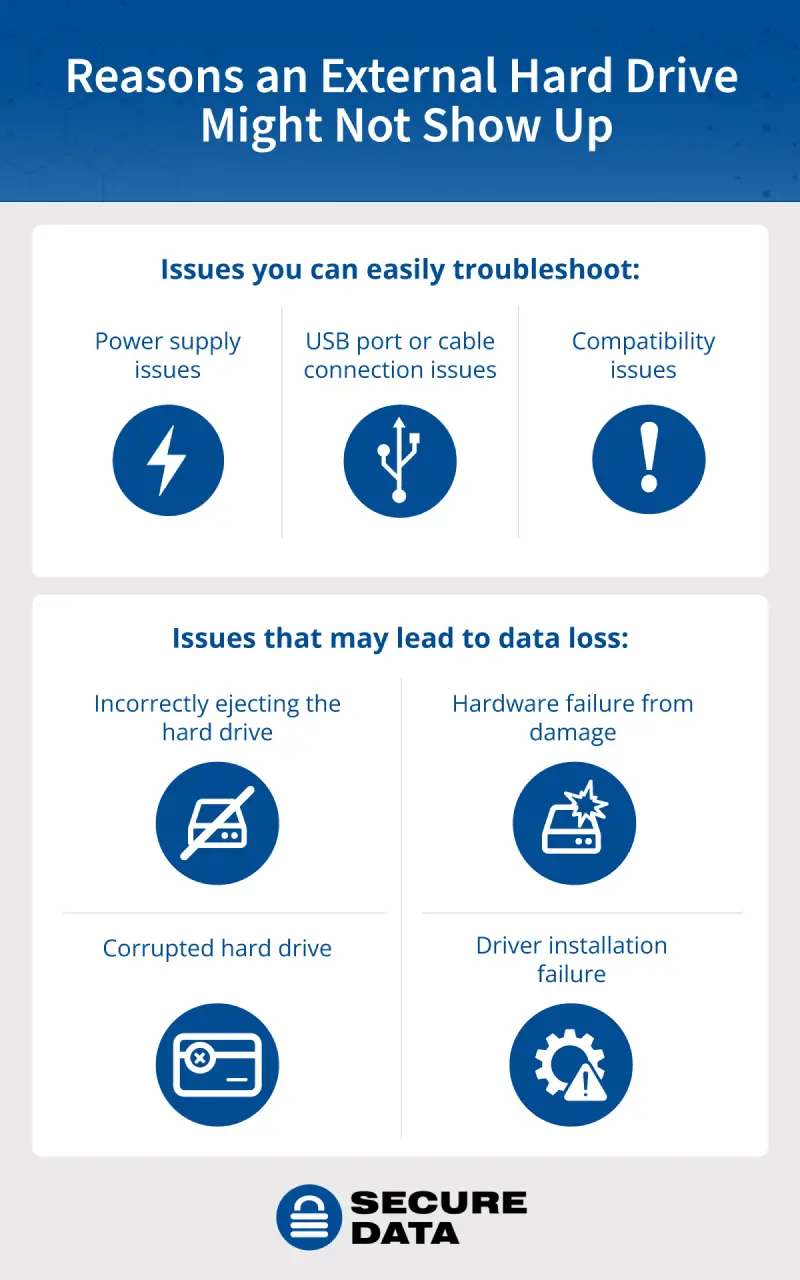
If your hard drive isn’t showing up on your computer, your drive could have both hardware or software issues. Although they don’t have moving parts like hard drives do, storage devices, such as SD cards, portable SSDs, and USB drives can suffer from the same issue of not showing up. These are a few common reasons an external hard drive might not show up, and they’re fairly easy to troubleshoot:
These reasons are more concerning and could lead to potential data loss:
If your external hard disk is not backed up and you’re concerned about losing your data, contact us to see if hard drive data recovery is the next best step. Attempting to fix external hard drives yourself by formatting them, using data recovery software, incorrectly partitioning the drive, or incorrectly using disk repair tools could lead to data loss.
How to Troubleshoot Your External Hard Drive Not Showing Up
Try these troubleshooting steps for both PC and Mac to get your external hard drive back to functioning properly.
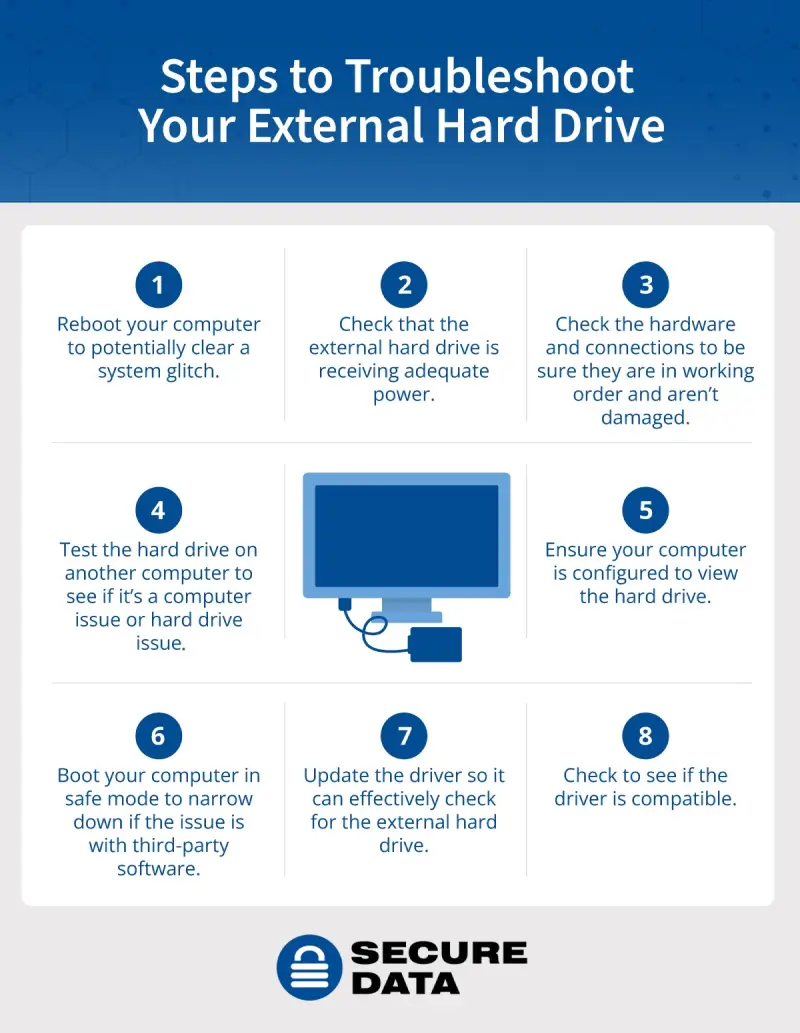
Reboot Your Computer
The very first thing to try is rebooting your computer by restarting the system. If your disk drive isn’t showing up due to a glitch or a software issue preventing your system from recognising the device, rebooting it should correct that.
Rebooting your computer helps to reload and refresh the drivers which manage how the OS (operating system) communicates with the external hardware, such as hard drives.
Check the Power Supply
Some external hard drives come with adapters you plug in. If the adaptor is broken or the drive isn’t receiving adequate power, it might not show up. You may need to try another outlet or a different adapter.
If your drive is connected through a USB hub, do the following:
Check the Hardware and Connections
Check your hardware, such as the hard drive, ports, and power cables, to see that any and all connections are in good working order, aren’t damaged, and aren’t incorrectly inserted or connected.
Before you try any of these methods, you’ll want to safely eject any other hard drives that aren’t essential to viewing the hard drive you’re trying to view.
If you find your connections aren’t working properly, this is a great time to try the next step.
Test the Hard Drive on Another Computer
Try testing the external hard drive on another computer if you can to see if the same issue occurs. This will help you determine if the issue is with the drive itself, or with your computer. Here are the steps for that:
If your drive shows up on the other device, the hard drive is likely fine. However, your computer could have an issue with recognizing the hard drive, either from incorrectly ejecting it, not being compatible with the device, or because the computer needs a software update.
If it shows up on the other device, or if you can’t check it on another device, then continue with the next steps.
Ensure Your Settings Are Set to View the Hard Drive
To find your hard drive that’s not viewable in Finder (Mac) or File Explorer (PC), you can do the following:
For a Mac:
You can locate your file manager in the Finder on your Mac. If your Mac isn’t set to show external hard drives, you’ll need to set that up so you can view it:
- Edit your Finder’s settings by going to Finder > Settings > checkmark Hard disks and External disks
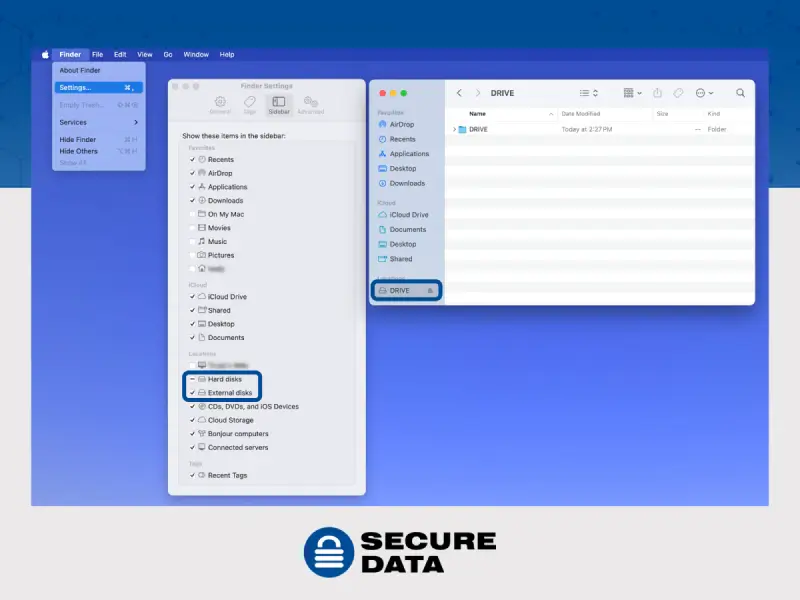
Additionally, you may need to do the following:
- Open Disk Utility. Disk Utility will allow you to view a disk and mount it so that it’ll be visible in the Finder.
- In Disk Utility’s sidebar, select Show All Devices. You should see your options appear on the left-hand side.
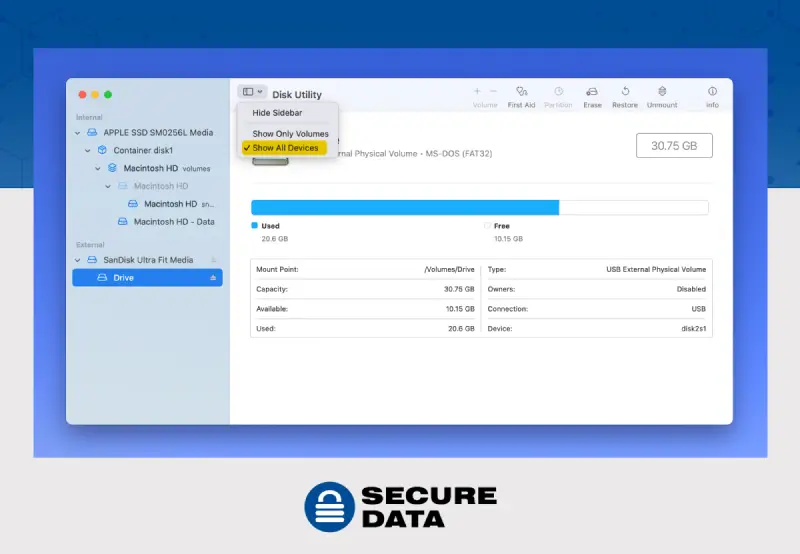
- Click on the hard disk you’re trying to open.
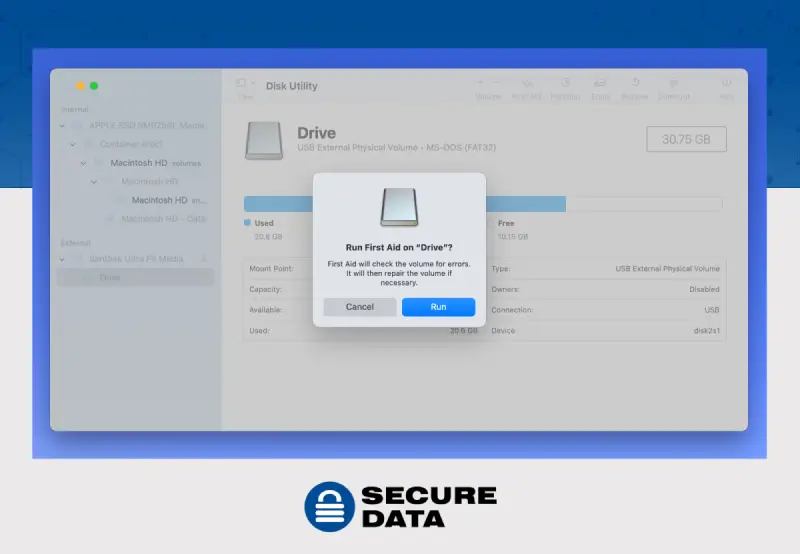
- Attempt to Mount it. If it doesn’t mount, then you’ll need to run First Aid.
- Run First Aid.
- Attempt to Mount it again.
For a PC:
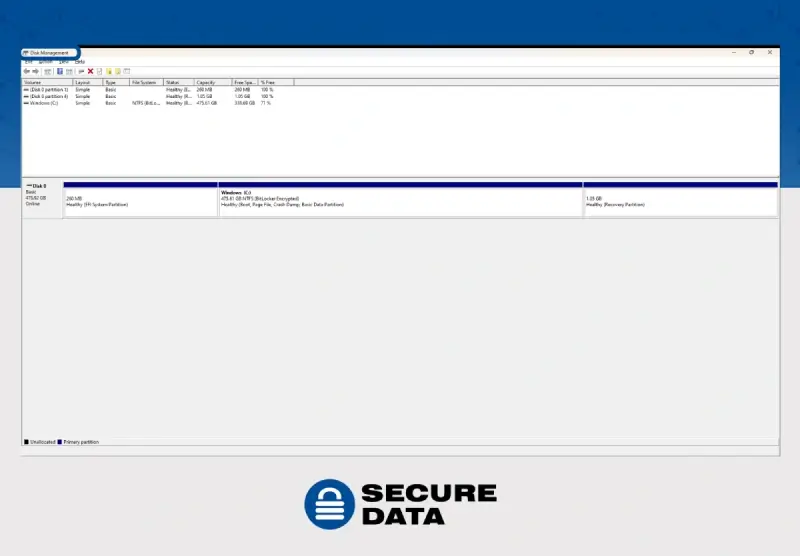
Here’s how to locate your drive on a Windows PC. Note: You should not add a drive letter to an internal hard drive as this can affect the operating system and its applications.
- Right click, or long press, the Start or Windows button and select Disk Management. You can also search for it in the search bar at the bottom of the screen. Alternatively, you may go to File Explorer and click the PC and select Manage.
- Open Disk Management to view the disk.
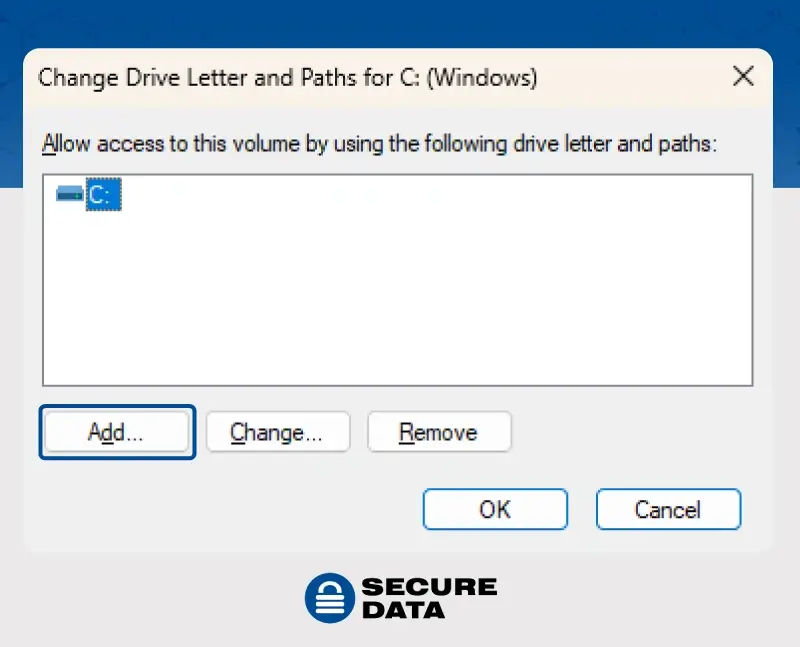
- If the Drive Letter isn’t showing up, you may need to add a Drive Letter. Either select and hold or right-click on the volume you want to change or where you want to add the drive letter, and click Change Drive Letter and Paths… or,
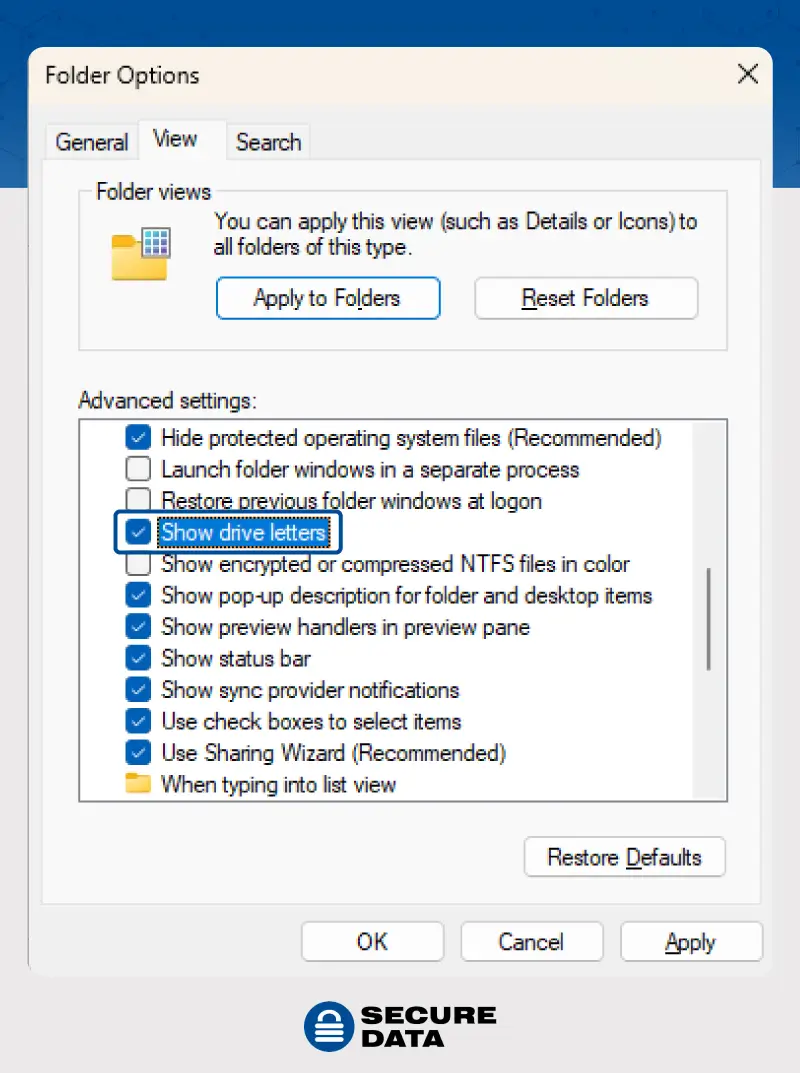
- Go to File Explorer. Either click the three dots at the end of the ribbon or select View. From there choose Options > Folder Options > View > Select Show Drive Letters > Apply.
If a Drive Letter isn’t assigned to the external hard drive, you’ll need to assign it a letter that isn’t already assigned to another external hard drive you might use at the same time. However, if your data has been corrupted, a drive letter may not show up anyway. If that’s the case, you should seek help from Secure Data Recovery.
- Right-click on the drive if you can view the drive in Disk Management > Select Change Drive Letter and Paths… >
- Click the “Add” button > Assign the following drive letter > Select the letter you want to assign > Select OK and the contents within that drive should pop up.
- If it doesn’t show up, restart the system.
- Check back in Disk Management to see if the disk is viewable now.
- Check if it’s viewable in File Explorer by clicking the File Explorer at the bottom of your start page, search for File Explorer, or click Start > File Explorer > View and This PC to see the Devices and drives viewable.
If that doesn’t work, you’ll want to continue onto the next steps. When in doubt, you can seek help from Secure Data Recovery to ensure you don’t lose your data.
Boot Your Computer in Safe Mode
Booting your computer in safe mode starts your computer in its basic state, so you can narrow down potential causes if the issue is with third-party software or non-essential drivers. If the external HDD doesn’t appear in safe mode, the issue could be with the hardware itself.
For a Mac:
By booting your Mac in Safe Mode, you’re able to identify if the issue you’re dealing with is due to software. Safe Mode works differently if you have an Intel-based Mac or an M-Chip processor, also called Apple silicon. You can find which type of Mac you have by clicking the Apple logo in the upper left corner > About This Mac > see the processor type.
For an Intel-based Mac:
For a Chip-based Mac:
For a PC:
Boot your Windows computer in Safe Mode from the sign-in screen on Windows 10 or Windows 11:
Update the Driver
Next, try updating your computer’s driver. Here’s how to do it on both Mac and PC.
For a Mac:
If the last step doesn’t work for your Mac, shut your computer down, unplug nonessential devices, reconnect the external hard drive, then turn it back on.
To update the driver:
- Select the Apple icon in the upper left of your computer > click System Settings, or System Preferences.
- Go to General > Software Update > Update it

For a PC:
If the PC settings changes didn’t work, you can do the following software update:
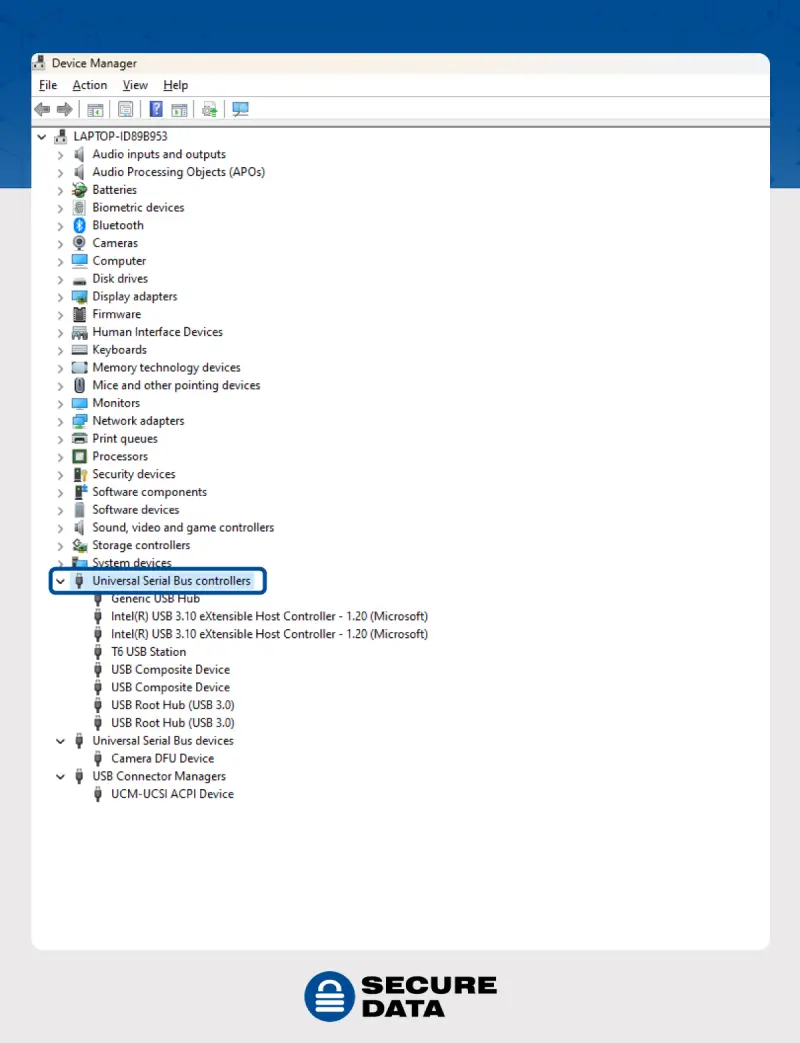
- Right click on the Start button and select Device Manager.
- Find the device that needs updating by right clicking on it and choosing the Update Driver option > Search automatically for drivers > Search for updated drivers on Windows Update > Download and install the update. Or, expand the Universal Serial Bus Controllers section > right-click on the USB device > select Update driver.
- Once the installation is complete, restart your computer to apply the changes made.
Alternatively, you can update USB drivers on a Windows by doing the following:
You can check the driver version in Device Manager by right-clicking on the USB device > Properties > then Driver tab to view the version and details, ensuring it’s up to date.
Check to See If Your Drive Is Compatible
Compatibility can also be an issue, causing even functional hardware to seem like it isn’t working.
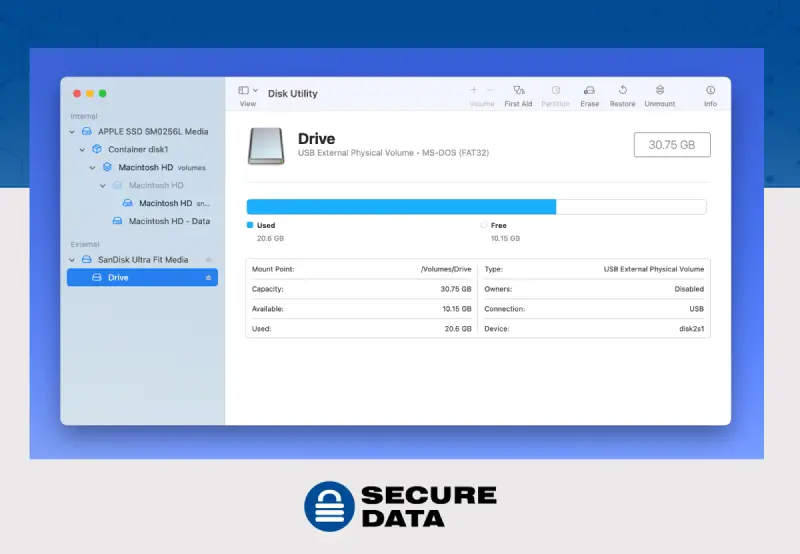
For a Mac:
- Select Disk Utility to see your hard drive disk.
- Once selected, you should be able to see text underneath your disk’s name next to USB External Physical Volume that may say “Windows NT File System” or “NTFS,” which means you have an incompatible drive with MacOS. For instance, MS-DOS (FAT) is compatible with both Windows and Mac.
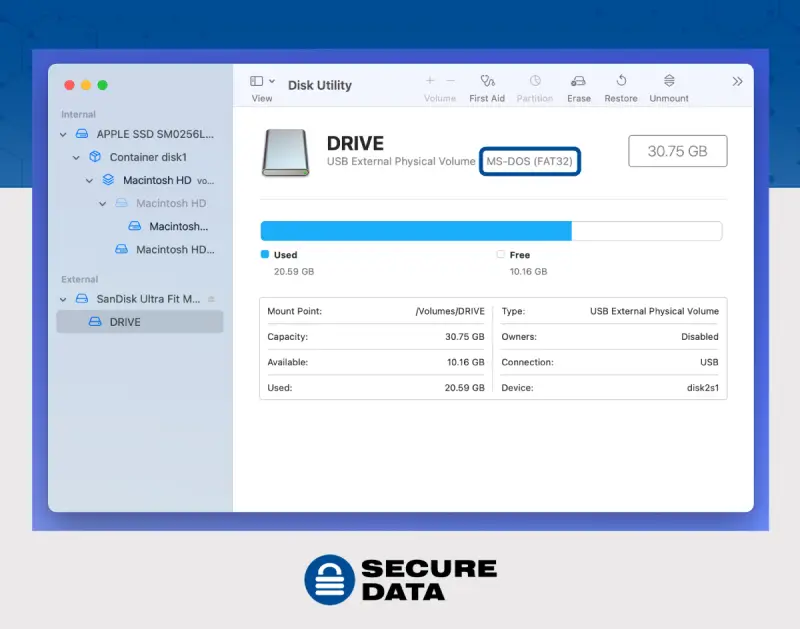
While your Mac can read the information within that drive, it can’t write to it. You’d have to either reformat it, which we don’t recommend as it could lead to data loss, or use a compatible system to access the external drive.
For a PC:
You can use the Windows Hardware Lab Kit (HLK) to see if your drive is incompatible with your device. If you find out that your driver is incompatible, stop where you are in the process and contact Secure Data Recovery for further assistance at 0800 102 6925.
If none of the earlier steps worked, stop where you’re at, contact us, and we’ll recover your data for you.
Troubleshooting Methods to Avoid
When you have driver issues, there are some methods you shouldn’t attempt to troubleshoot because they could lead to additional data loss.
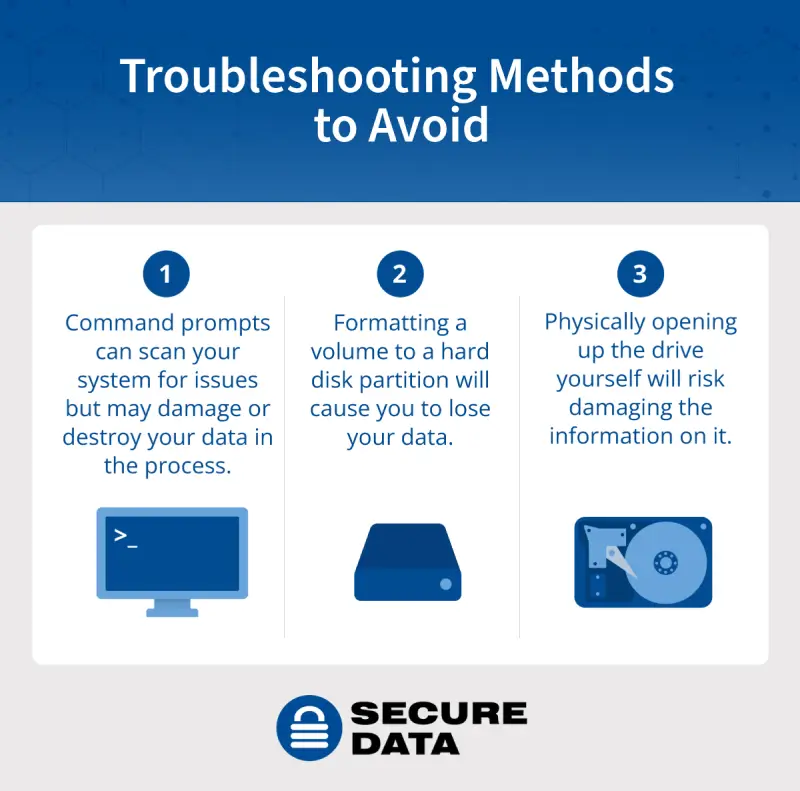
Avoid the following troubleshooting strategies:
When to Consider a Data Recovery Specialist
For the highest chance of full data recovery, it’s usually best to seek professional help. For example, if your issue involves reformatting your hard drive — which involves transferring and deleting your data — working with an expert at Secure Data Recovery eliminates the potential for human error at various steps of these complex processes. The same goes for using a command prompt on your device, another potentially high-risk method.
We Can Help Recover Your Data
It’s incredibly stressful when your devices aren’t working as they should — especially if they contain critical or sensitive personal data. No matter what the issue is, Secure Data Recovery can help you get your lost data back.
We’re so confident in our expertise, we offer a “No Data, No Recovery Fee” guarantee — if we can’t recover your data, you don’t pay for our services. Call Secure Data Recovery for your free quote today!


